Monday, January 31, 2011

Updated ETSY

My Etsy has been lonely for a while. But now it has a little makeover and its all updated and there are new things on there. 


Head on over to my ETSY to check out all the lovelies I have for sale. Thanks for your support!

Reusable Coffee sleeve- From Recycled grocery bags!

I drink coffee everyday and I feel like these sleeves go to waste. I try to remember to save them but sometimes I forget. 


So I decided to make these reusable ones. Bonus: they're CUTE!


I started by fusing together used grocery bags. (If we are doing the eco friendly thing, we've gotta go all the way.) If you need a tutorial on fusing bags, go here.  

 Once they are all fused together use a sleeve as a template to cut the shape out of the bags. I used a template that I got offline and it was too small. I would suggest using one from a coffee shop.
 Then you will have something like this.
 Use the same template and cut out a scrap of fabric a little bit smaller than the plastic sleeve.
 
 I picked out a colored thread. I thought red would go cute with the black and white fabric. I stitched a straight line around the edge to make sure the layers of plastic wouldn't separate.
 Then I used a zig zag stitch to hold down the fabric.
 I think it turned out really cute with the red thread
 I used some hot glue to attach velcro to the edges.
 Then you're done.

Thursday, January 27, 2011

Hanging makeup roll


I had all of my makeup brushes in a cup.. but then my friend gave me this little medicine cabinet and the cup doesn't fit in there :( So I wanted to make something that I could keep  out when I was home, but I could easily take it with me when I go out of town or stay at the boy's house. 

I thought this was the perfect thing to hang on the inside of the medicine cabinet door when I'm at home, shut it away in the door when I'm done, then roll it up and take it with me when I'm on the go.

 Measure out how big your square should be based on how big your biggest brush is
 Make sure you have enough fabric to fold it half over the brush
 Put the right sides together and sew around the edges, leaving a space un-sewn to flip it right side out.
 Then once you flip it right side out, sew again around the edges (sewing up the hole)to keep it flat.
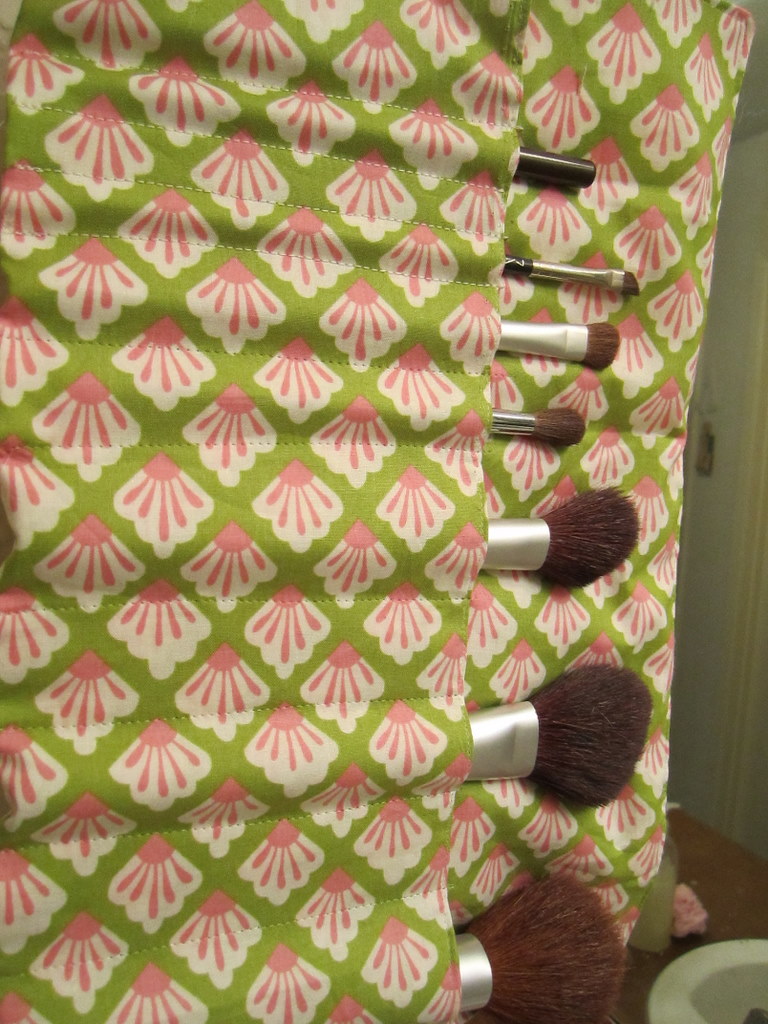
 Then fold one side half over (the pocket for the brushes) and pin where you want each seam to be in between the pockets. (am I making sense??)
 pin a piece of elastic into the edge seam to keep the bundle together. The stitch up to the pin points (where the red lines are) to separate the pockets.
 Then you're done
 You can roll it up when you are on the go.

 or leave it out when you are at home.


I'm Linking up! So check out my Link tab and support the lovely hostesses.

Wednesday, January 26, 2011

Valentines day Wreath- IN 5 MINUTES!

Origninally I wanted to make a wreath like on of these that I found on Simply Designing. I went to 3 Dollar trees and Jo-Annes to find a wreath base that was solid like that.. like a Styrofoam type... (what am I trying to say here??)

 Anyway, At Jo-Annes they had these styrofoam wreaths but they were too small. I wanted a bigger one. Then I saw this "grape vine" wreath. I loved how rustic it looked and I thought it would be a nice contrast with the sparkly heart picks I had already bought and the yard I already had. Plus, it was only $3. Way better than the smaller $8 styrofoam wreath.
 The heart picks I bought from the dollar tree (2 packs but I didn't use them all) The yarn was on hand and the wreath from Jo-annes. Total $5 (cheaper if I had a 40% off coupon)
 I started by just placing the picks into the vines. Pretty simple.
 I trimmed off any ends of the picks that stuck out. Then took yarn a few feet at a time and tied and wrapped it around the wreath.
 TA-DA! I love it! I think its simple and cute.
 It doesn't have any glue in it so when valentines day is over I can change it out for the different seasons. Its super cute and it seriously only took me 5 minutes and $5. Totally worth it

Tuesday, January 25, 2011

Baby Onsie for a BOY!! (shocking, I know)

There are so many cute things for little girls and I feel like the boys get a little left behind. One of my friends, my cousin and my roommates sister(who's having twins) are all having boys! I wanted to make cute little girl things!!!

But I thought that this idea was super cute and not only that but it was also quick and easy. I used a onsie from the Dollar tree as a practice. The fabric was pretty thin so it made it hard to sew on. But I'm sure that yours will look much better ;) (and my next one).

 First get a onsie and some scrap fabric (my total cost: $1). If you have a onsie or shirt that has a stain down the front this would be a perfect project for that.
 Then fold your fabric in half and cut out half a tie shape. The fold makes sure that the tie is symmetrical. Then cut out a "trapezoid" shape for the knot at the top of the tie. Pin everything down.
 Use a zig-zag or blanket stitch to sew the tie in place. You can also use stitch witchery for this.
 I didn't use the right stitch for this, I should have practiced with my stitches first. I'm still learning the new machine.

I think it turned out pretty darn cute. Perfect for when your baby wants to be classy, yet casual ;)

Saturday, January 22, 2011

5-minute Cake in a Mug

Seriously?? 5 minutes+stuff you probably already have=a personal size chocolate cake?? This will be happening TONIGHT!!
source

Poppies and Poetry posted about this on her blog (with a link to the original post-er :] ) with all of the ingredients and directions. Go check it out... you know you want to! 

(and add her too! Shes new and needs some love)

Come on! Chocolate cake without the lingering temptation of a whole cake sitting around for the next week. ....or in my case next 2 days :P

Friday, January 21, 2011

Lace Back Tank

I got this doily from a thrift store for $1. I've had it for a while with the intent of doing this and I've finally got around to it.


You will need:
Lace or crochet doily (you can get these at the dollar tree!)
Tank top (on hand)
Sewing machine

 First: Lay the lace over the back of your tank top.
 Then: pin the lace to the tank top starting at the shoulders (or where ever it fits best) and trim off any odd parts. You can see I trimmed the top and bottom middle and also the sides of the bottom corners.
 Then sew the top by the shoulders and the bottom edges.


Sew everywhere there are red lines


Like this

Then flip the tank inside out and cut out the portion of the tank top where the lace overlaps the tank.

Then you are all done. I LOVE IT! I love mustard yellow and I love lace.

Total cost: $1


I'm linking up!! So check out my Link page and support all the lovely hostesses!