

Wow! Where have I been??
Ive been finishing up one of the hardest semesters since I started school. I had to make a portfolio of all of my work which took me about 160 hours just to assemble the books. And of course I procrastinated and did all 160 hours back to back. It was about 10 days of NOTHING but portfolio.
But I'm done!! and I was accepted into my program! Yay! There were 35 people who submitted and 22 made it in. So I'm pretty proud of myself :D Then we did a gallery showing of our stuff. Lots of Crazy-busy-ness. (Yea that's a word.)
But now I'm BACK! And I have lots of fun projects building up to show you. So lets get started, yea?
First up: Super easy Head wrap....That doubles as a belt!

I have this lovely little sundress that I love but I have no jewelery or anything to go with it. So while I was waiting for my roommate to finish getting ready for our outing, I made a headwrap. Headbands give me a huge headache almost instantly. Thats why I like head wraps because I can make them tighter or looser.
First step is to find some fabric you like and cut out 2 long skinny rectangles. I made mine a little fatter in the middle and skinnier on the ends. (could have sworn I took a photo of this)
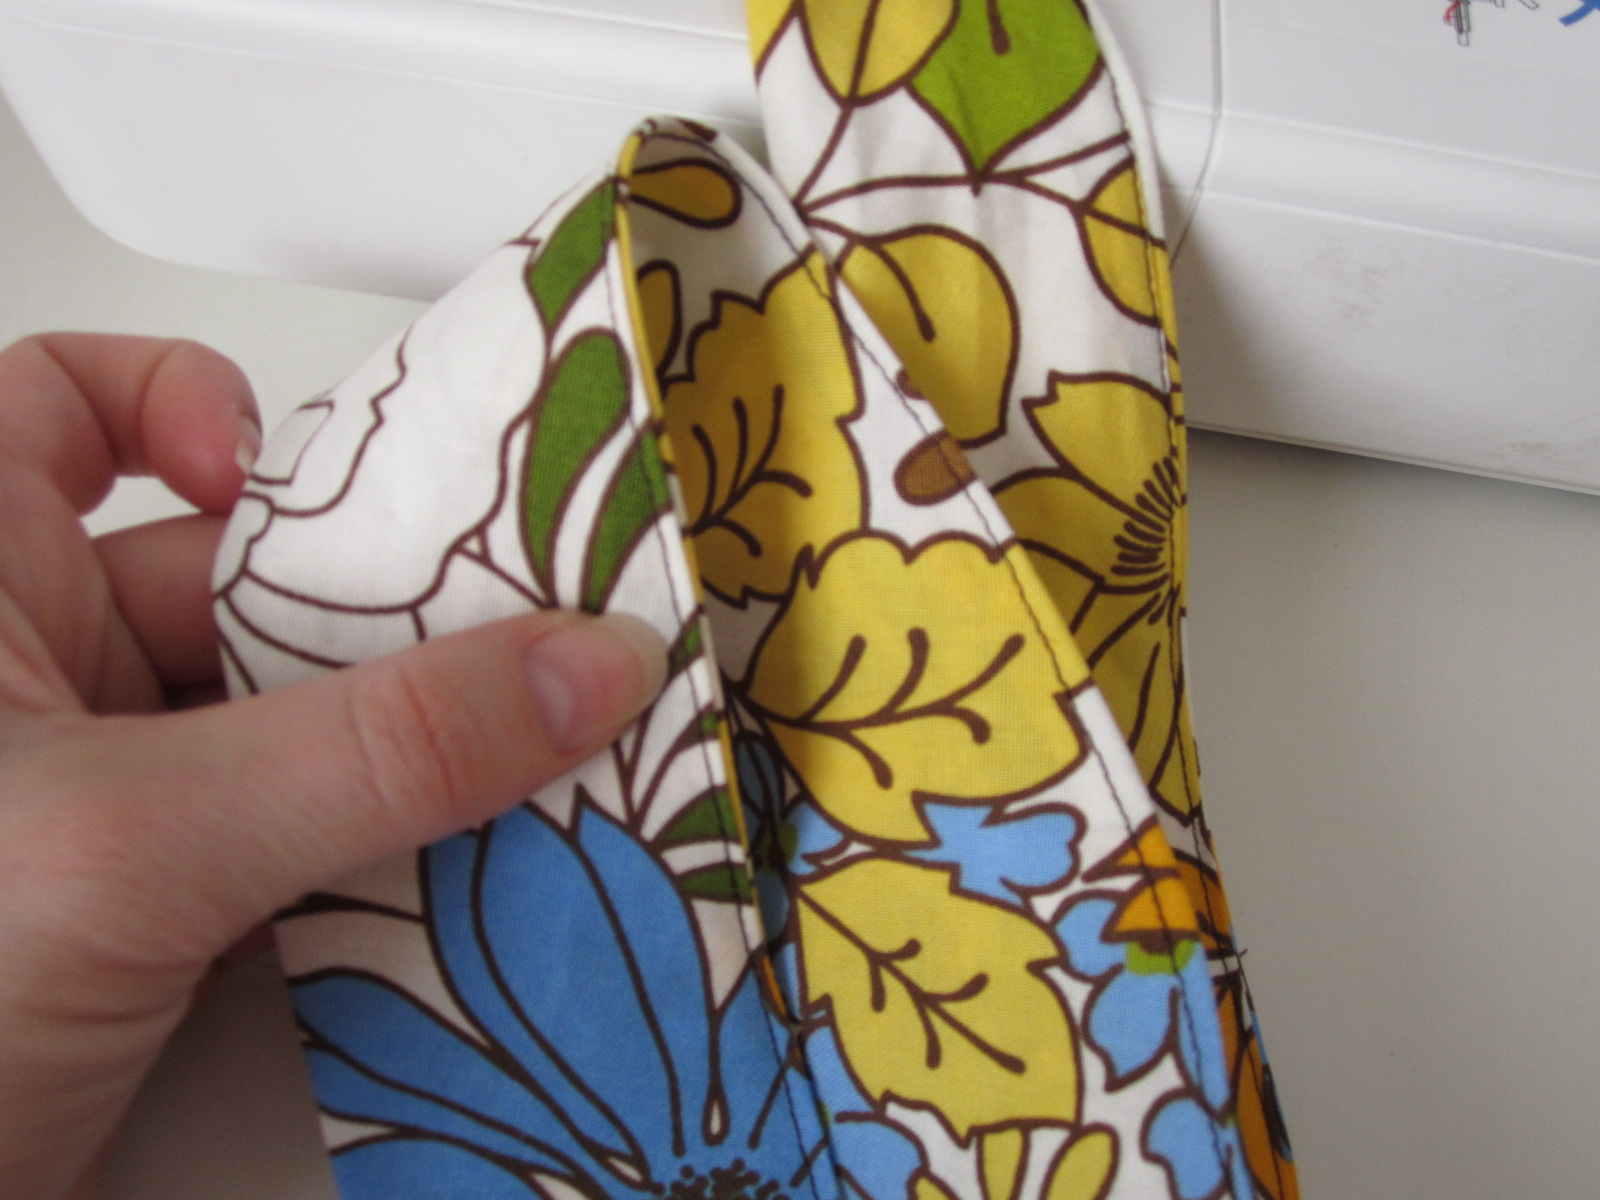
Then sew them inside out leaving a little space so you can flip it right side out.

Now flip it right side out

Pin up the hole that was left

If you are fancy, get out your iron and press.
If you are sorty fancy, use your hair straightener (that was already sitting on the counter).
If you are not fancy, skip this step :)

Then sew a top stitch around the whole thing.
Then you are all done!

And if you leave it long enough you can also use it as a belt!

Love it!
And it seriously took me like less than 5 minutes.

Wow, what a fun and easy project! Thanks for sharing this. It looks adorable on you as a headwrap and as a belt.
ReplyDeleteI absolutely LOVE your gorgeous headwrap/belt. Lovely shape and great pattern.
ReplyDeleteMy favorite trick for head wraps is to attach a couple small velcro dots to the underside. Then they really stay put in your hair.
Congrats on being accepted into the program!
it looks great with that dress!
ReplyDeleteVery cute! Makes me wish I had long hair again. Not sure I could make it look right with my short hair. But I love it on you. (And I never thought using an iron made me fancy!)
ReplyDeleteI would love for you to link it up to my party that is running now. Any linky goes.
ReplyDeletehttp://bacontimewiththehungryhypo.blogspot.com/2011/06/any-link-goes-party-running-now-summer.html
Come strut your stuff.
wow this is so pretty,love at first sight. :D
ReplyDeleteoh,n congrats :D
thanks!!!!
ReplyDeleteWe own and drive antique cars all the time (windows open and no air conditioning) and my hair is a mess all the time. I am going to make a few of these headbands to wear. Finally, I will look great when we reach our destination.
ReplyDeleteThanks,
Jan from Paris, Texas
I am not a member (?). I do have one question. How do you attach it?? Unless, do you do magic, also????
ReplyDeleteVoni
very cute! i'll have to do the same thing. i was just about to ask the same thing as anonymous did: how is it attached? is it just knotted? thanks for the idea! :) lisa
ReplyDeleteCute idea!
ReplyDeleteWhat a fast, cute idea! I totally want to make one. About how long were your two pieces that you cut?
ReplyDeletethis is too wonderful!! I get headaches from headbands too..thank you so very much.
ReplyDeleteWhy don't you tell us just how you attach this headband?? I guess you don't know as much as you thought about directions.
ReplyDeleteYou tie it! And you don't have to be so mean!
DeleteHear, hear.
DeleteI love it :) :) gonna try this soon! thanks for sharing!
ReplyDeletewww.themindofanexchange.blogspot.com
how long should the fabric be? how wide? thanks!
ReplyDeleteI made mine 1.5 inches wide. I suppose you can make them as wide or as thin as you want it to be. Anyway, the middle was 1.5" wide and then I tapered it down to the ends. As far as length goes, I just measured a headband I wear and then added 9" to each end so I was able to tie it and have a little extra fabric hang down. You'd have to measure your head to see how much length you need. Everyone's head is a different size.
ReplyDeleteNot sure if this helps, but that's how I made mine and it took no time at all. I DID make a paper pattern so I can use it again and again to make others. This way I don't have to waste time measuring and trying to figure out the length again.
Love it! Love the straightner/clothes iron! Gonna have to make this. I hate traditional headbands. I'm growing my bangs out (YUGH!) so I need something wide enough it doesn't look like I have an extra set of ears. You know the bangs coming around the sides goofy look. Hate it!
ReplyDeleteThis is so cute! I can't wait to make one for myself.
ReplyDeleteyeezy boost 500
ReplyDeletesupreme outlet
jordan sneakers
air jordan
golden goose
off white jordan 1
golden goose outlet
curry
kd 12 shoes
air jordan 1
hermes
ReplyDeleteTravis Scott Jordan
palm angels
goyard outlet
cheap jordan shoes
curry shoes
kyrie 7
golden goose
supreme clothing
a bathing ape
ReplyDeleteA last-minute headwrap is a quick and stylish way to adorn one's head, often using a scarf or fabric. 6800k Vs 6700k It's a versatile accessory, particularly handy when short on time but still aiming for a polished look.
görüntülüshow
ReplyDeleteücretli show
1JP
kd13
ReplyDeletejordan retro
fear of god outlet
supreme sweatshirt
kobe shoes