Showing posts with label Thrift. Show all posts

Saturday, October 16, 2010

A Brand new Sweater for 70cents!

Yes, thats right. I bought a brand new sweater for 70 cents. I got it off the clearance rack at Marshalls.

It had a little snag it it but I knew just the thing to cover it up.

 Its super easy and it took me about 5 minutes. First I layed out the ribbon in a squiggly pattern that I liked and that would cover the snag.
 Then I pinned it down and sewed down the center of the ribbon. All done!


Linking up to this party:
http://simplydesigning.blogspot.com/2010/12/link-party.html


Thursday, September 2, 2010

DIY tall planter

I made this planter about 6 months ago and never posted it. I'm a little too late because DSC featured the same idea.  Great minds think alike! I found these pots at the dollar tree and bought them without a plan. While I had them just stacked there waiting for some love I thought hmmm they would look pretty good stacked.


I flipped one upside down and glued the other one on top with hot glue. I transplanted a succulent (that's a fancy word for "its ok if you forget to water it") into it and I'm done!


Don't forget to check out my ETSY, MadeInTheAli. I will be posting "hair goodies" this weekend!

Monday, August 16, 2010

Vintage Lace Ring

Steppin thru Crazy made this Lace Ring a while ago on her blog. Shortly after I found the perfect lace for making this ring. However, it took me Months to find ring blanks (an empty ring with the glue pad on top). Finally I found some at the Dollar Tree of all places. But they already had tacky flowers attached. So I ripped them off and attached my own lace flowers.


This is how the lace doily started.

If you can't find ring blanks, you can also use ribbon and glue it into a circle to fit your finger.

This whole thing cost me $2 for 6 rings. I got 8 flowers for $1 and 6 rings for $1. I love them. I think they are adorable. I'm so glad that I finally found the rings for these. I will be wearing purple tomorrow :)

Monday, August 9, 2010

Cusioned Fabric Headboard

I've always wanted a cushioned (padded?) fabric headboard. While out "Thrifting" I found the perfect headboard and footboard for $20. Since I've been "staple-gun-happy" since I covered my chairs I figured this would be the perfect time for this project.  Read on to see a tutorial.


Tuesday, August 3, 2010

Dining Chair Re-vamp

Remember when I bought this dining set? Well I finally found some fabric I like. It coordinated well with my living room and since the living room and dining room are pretty much the same thing, it worked out well.

Isn't it beautiful?? I'm excited that they came out so great. Ive never recovered anything before but it was SO easy! ANNNDDD I'm in love with the staple gun! I borrowed if from my dad and I will for sure be investing in one of these. Read on and I'll show you how I did it.


Monday, August 2, 2010

Goodwill-Goodfind

I stopped by the goodwill today (the one that always has good things but is in the ghetto:P ) and found a few great things.

First I found a little corner shelf that I will put in the bathroom. I need to paint it first so I will show you that later.

Then I found 2 candle holders.... I think they were both candle holders anyway. Of course I forgot to take a "before" picture because I was so excited about getting started. But pretty much I just glued them together.


 I love all of the detail on the base and the top gives it some "classy" sparkle. It doesn't really go with the decor of my house. So I think I'm going to give it to my mom :) I think she will love it!

AAAAND! Sneak peak! That fabric that the candle is sitting on will be the fabric for my dining chairs! Stay tuned because that's what I will be doing today.


Saturday, July 31, 2010

Dollar Store "Faux"-pothecary

UPDATE: I finally found it! Here is the link up to where I found this idea.

 I've been seeing a lot of these apothecary jars in BlogLand and I haven't been able to find any at the thrift stores. But then I saw this idea of taking candle sticks and glass jars from the dollar tree and gluing them together. I was on that idea in a matter of hours.

I Really hate to take an idea and not give credit to the blog I found it on, but I was SO sure that I found the blog from the "dollar store crafts Facebook page" and now I can't find it for the life of me! I googled it and found a few blogs with similar ideas but not the same one I saw. So if I find it, I will for sure update this.

So here is my work in progress:

 Now I HIGHLY HIGHLY recommend finding a base similar to the one on the right.... because otherwise you will have something top heavy and you may end up with a situation similar to this:
And then there were 2
Here are some pictures of my bathroom:
The Rug

I'll keep you updated on the bathroom sink. I'm not totally satisfied.... Then again, will I ever be? :P

Tuesday, July 27, 2010

Lace Ring

As I was thrift shopping I saw this cute little lace doily that was a little stained. I got it for just $1. I thought it would be perfect for this lace ring that "Stepping thru Crazy" made on her blog.


Keep Reading to see how it turned out!


Tuesday, July 20, 2010

A chair I "Found in the Ali"

So let me set the scene for you:
I'm driving down the street after doing laundry visiting at my parents house. Then there.. I see it.. A cute little chair. Sad. On the side of the road. Calling out for a paint job. No, I don't need that... I have no place to put it. Should I? Shouldn't I?


Thursday, July 1, 2010

4th of July Ruffle T: FREE-vamp

I made this shirt 2 years ago for the 4th. I'm not so in love with it anymore and I don't really want to go spend more money on a shirt that I will probably only wear once (ie: the one from 2 years ago). So I decided to re-vamp this shirt using stuff I had...free-vamp :)

Here is before:
and After!


All I did was add some red ruffles to it (it covered up a stain too, score!). If I were doing this for a kid I would maybe add some sparkle to the stars. But I figured I would keep it a little more simple. I will driving up to Bass Lake on Sunday so I didn't want to go all sparkly up there.

I think it came out pretty cute!

Monday, June 28, 2010

Ruffles and stuff

Ive seen so much of this ruffle all around "Blogland" so I thought that I would try it. It was super easy! Which surprised me a little. I used fabric on hand and a tank top I already had. The tank top actually had a stain from work so the ruffle was perfect to cover it up.

Here is a picture of me in my newest creation that I paired with a skirt that I got at TJmaxx on Clearance for $5. I just wanted to brag about my good deal :P

If I were to do this again I would:
-use fabric that doesn't unravel
-not be lazy and use the same color thread as the fabric :P
-do the first stitch off center, pull the 1 thread to ruffle, sew it to the shirt down the center of the ruffle, then pull out the first stitch so that you are left with 1 stitch down the middle instead of two mish-moshed together.


I Think it turned out so cute. I plan to make more :)

Monday, June 14, 2010

Fathers day Gift!

My dad is the HARDEST person to shop for. He has everything and wants nothing. Ive only been able to give him home made things or "coupons for a dinner date". So this year since I've been so crafty lately I thought I would craft him something. But Dad and Craft don't always go well together.. for my dad anyway.

Then I thought I would design him a personalized shirt! This cost me $1! If your sneaky you can even snag one of his own plain T-shirts and personalize it. Then its free :P
Read how to do this after the jump!!


Thursday, June 3, 2010

Decorate your own Dishware: Less than 50 cents each!

I stopped in my favorite thrift store and I never fail to leave with a great find. I found 2 sets of plain, clear, plates. One was 5 smaller plates for $2 and one was 4 medium sized plates for $2.40. That's 48 cents a plate. With paint on hand, I have a 2 sets of plates for less that 50 cents each.


You will need:
-acrylic paint
-spray paint, clear and or color
-clear plates

ONE: Paint whatever pattern you like on the BACK of the plate. I chose a branch and a little birdy.


TWO: Spray paint a color over the design on the back of the plate. If you would like the plate to stay clear, then just spray a clear coat. I chose red to match my kitchen.

THREE: Spray a clear coat over the color for extra protection.

After it drys you are all done!!


Now I haven't washed them yet, But I would suggest hand washing them. Since you only painted on the back, you don't need to worry about eating off of the paint. They are still safe! They make great dishware or you can decorate your kitchen walls and display them with plate hangers. You can even have your Kids paint their own plates!

This is my first set (the small ones) I will let you know what I do with the large plates!


UPDATE: After using these plates for a little while the paint started to peel off the back. These would be be better for hanging on the wall as decoration. Your other option would be to spray the back of them with a glass paint, I just used regular " whatever I had" paint. 

Monday, May 24, 2010

Dry erase memo-board

At Dollarstorecrafts.com I saw this cute little memo board made from a frame. I picked one up the other day and I "fancied" it up today. I also made another mini one specifically for keeping track of bills. None of my bills are due at the same time of the month. They are all spread out so I lose track. Its a good thing and a bad thing. Anyway. If you need a tutorial you can find it here.  Here are the little ones I made:

This cost me $2 for the frames. The rest I had on hand. But now that I think about it.... I have like a million frames I could have used. Oh well :)

Saturday, May 22, 2010

Im ALIIIIIVVVVE!

I'm Back! I'm alive! I Survived!!

I'm finally finished with finals (maybe they call it finals week because when its over, you say finally!). Since I'm a design student I didn't have any tests.. just projects. I pulled a few all nighters. But I survived. I fought the urge to walk away from projects and craft. So now that's officially summer I can craft any time I want!!

I went to an Estate sale on thursday and found the exact dining set I have been searching for. I wanted a set with a sturdy table and chairs with a padded seat so I could recover it with something cute. The table was $250 ("its worth $1800 doncha kno?") but being the bargain hunter that I am, I talked him down to $135 DELIVERED! The guy could have been a used car salesman.

 The picture was taken before I even cleaned it. Its amazing what a little bit of furniture polish can do. Anyway, I planned on painting it but it was in such good condition that I may just recover the ugly vinyl seats.

 I will definitely post when I recover the chairs. I can't wait! Ive never recovered chairs so let me know if you guys have any tips for me!!

Friday, May 7, 2010

T-shirt Tote-bag

My roommate has an old Bob Marley shirt that was her dad's. It has a few holes and it was over sized but she couldn't bare to let it go. So she let me turn it into a tote bag!

This is a great way to hold onto all those shirts with memories attached without wearing a sloppy T-shirt! READ ON to see how I did it.

Sunday, May 2, 2010

Fabric Covered Mirror

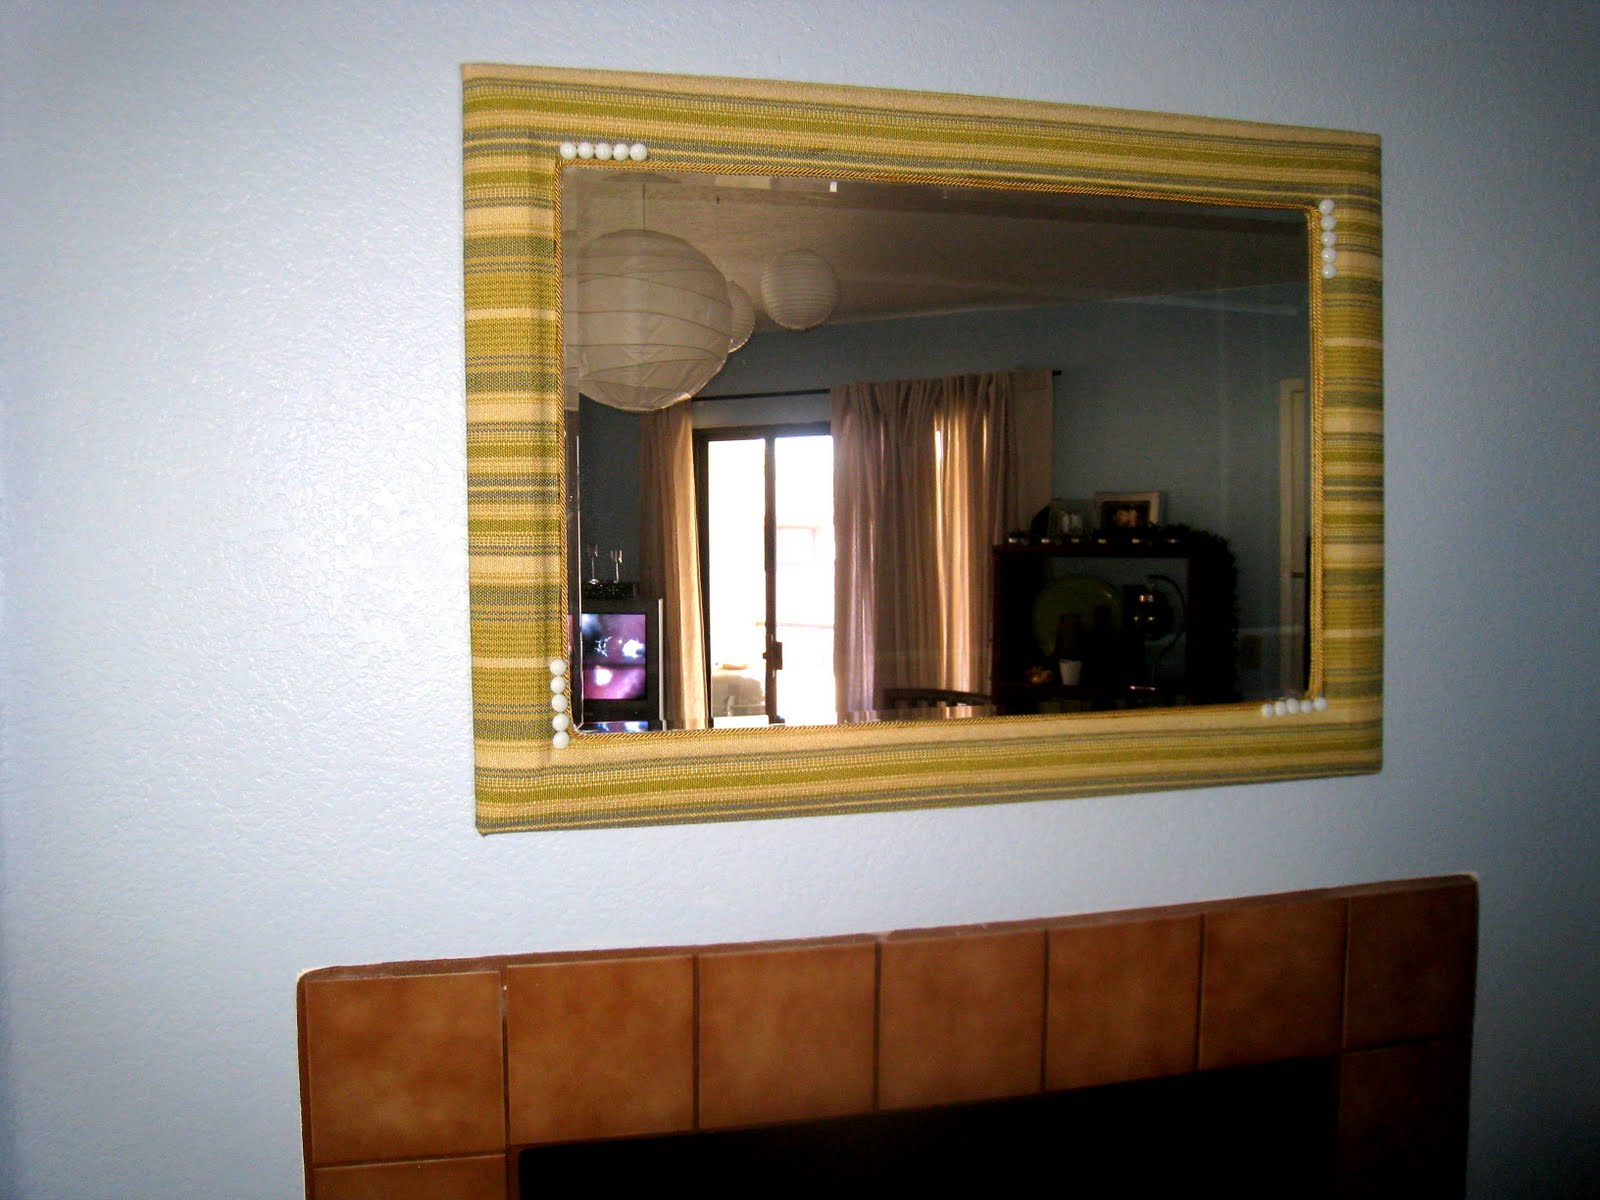
I bought this mirror at a garage sale for $4. It was pretty nicked up so I tried to paint it... but I hated it. So I covered it with fabric. "Read More" to see how I did it.


Sunday, April 25, 2010

Organizing the Design Clutter!

As you may know, I am a design student. What you may not know is that what this really means is that I am required to buy a lot of REALLY expensive art crap that I never end up using and can't bring myself to get rid of in case I need it in the future. :) So now FINALLY I have found a solution to the organizational hell of my design clutter! And it only cost me $32! Ahhhhhh Heaven. Read on to see whats inside the "magic design cabinet".....


Wednesday, April 14, 2010

No-Sew Halter Top


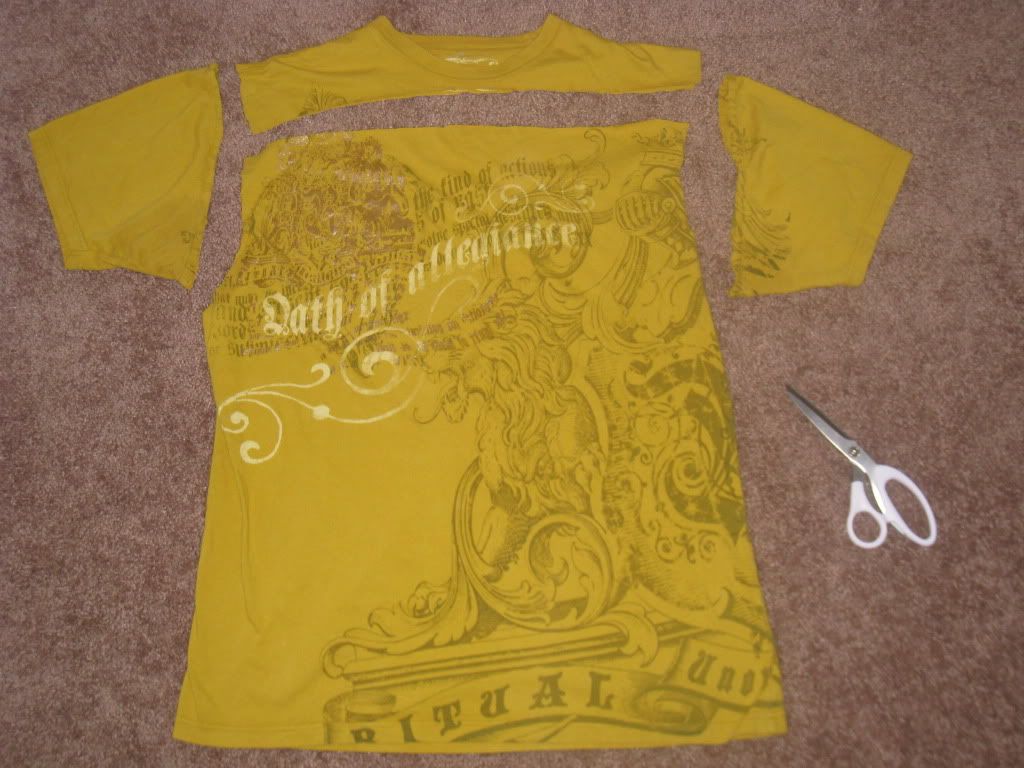
 I got this Men’s shirt from a thrift store by my house called “Thrift Redefined”  for $2.00. I love this color and i loved the pattern on it so I decided to make it into a halter top for me. Its really easy and it takes about 10 minutes.


Step One: Find a men’s XL shirt and cut off the sleeves and the neck


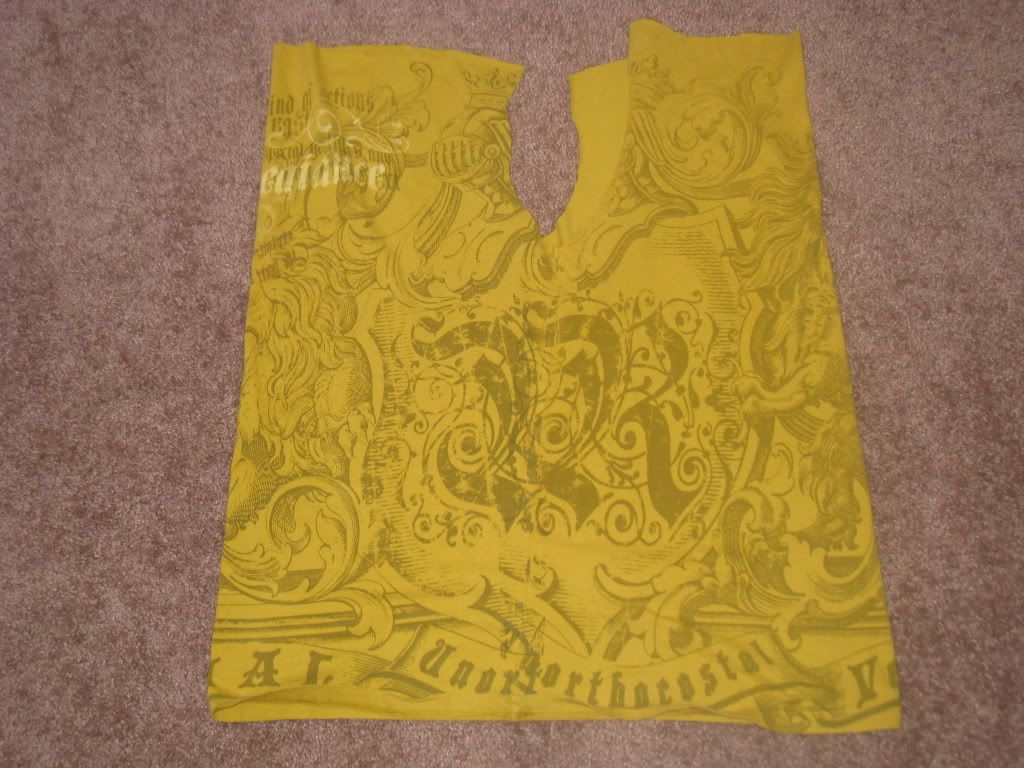
Step Two: Turn the Shirt to the side so that the sleeves are in front and the back. (instead of on each side)


 Step Three: Cut a strip of fabric off of the neckline of the shirt and tie it to the two front corners so that you have a neckstrap


Step Four: Flip shirt over and cut strips in the back opening. I Cut about 4-5” long strips. Cut them longer if you are smaller and shorter if you are bigger. Then tie the strips together so it fits snug on your body.


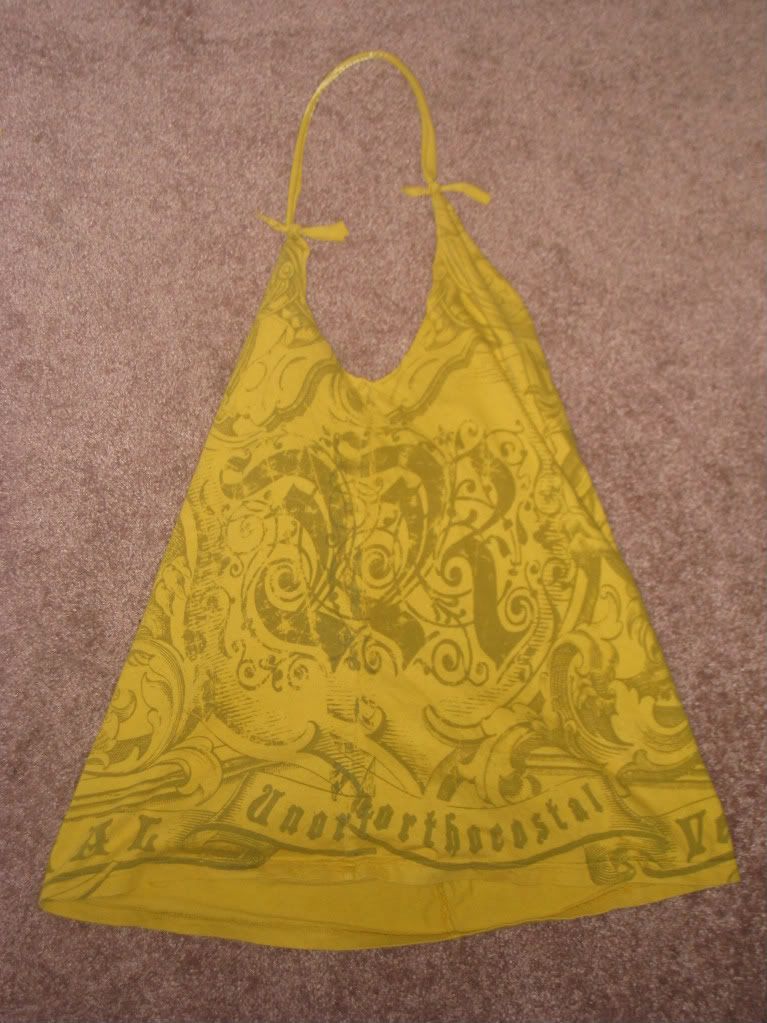
 Last step is to put your new shirt on and adjust any ties bigger or smaller as needed. I even put a clip in the front  to bunch it a little more in the front.


 TA-DA!!
Here is another shirt I did that is the same style. I got this gray shirt from The Dollar Tree and then I did an iron on pattern with plastic bags! Here is the tutorial from “Filth Wizardry”  on how to iron on plastic bag transfers.


 Enjoy!